
Nuxt 4 First Steps 🚀
Your ultimate and extensive guide on how to start with the latest version of Nuxt.js

Hi everyone! Before we jump in, I’d like to say hello to all of you and thank you for reading. This is the very first post on the vue.house Newsletter, and I hope you’ll love it and find it both informative and insightful. If you’re interested, you can read a few more words about me and this publication on the about page. Enjoy!
Before Start
I'm planning to write a series of articles on how to plan, design, and build applications with Vue & Nuxt - you may think about them as a comprehensive course or seminary. I'll be covering all the features, gradually breaking them down one by one - starting with the basics, showing how they work, and demonstrating how to use them effectively within the ecosystem. As we progress, I'll dive into advanced techniques and optimizations, equipping you with the knowledge to build highly efficient and powerful web applications.
Don't worry if something isn't covered right away - this journey is designed to build up your understanding step by step. Along with exploring specific parts of the framework, I'll also explain why they were built, what problems they solve, and how they fit into the bigger picture. By the end, you'll have a solid grasp of Vue & Nuxt, from the fundamentals to the most advanced techniques.
My only one request to you is simple - if you spot anything incorrect, outdated, or unclear, please let me know. Software evolves constantly, and some parts of this publication might become misleading over time. So don’t hesitate - reach out to me right away. I truly appreciate your feedback in keeping this content accurate and valuable. Thanks in advance, Lukas! 🚀
Last but not least - my take on AI. No doubt, you can work and learn with any leading GPT. However, I believe that truly understanding the context, seeing how everything connects, and learning without feeling overwhelmed requires proper “protein guidance”. AI can be a powerful tool, but it might not always provide the clarity and structured learning path that an experienced mentor can. Still, I’m just a human. 😅
Additionally, here you can read the coding guide, for better understanding the way and standards of how we will be approaching various things here.
Let’s Start
Alright, let’s dive into the main topic.
Nuxt 4? Wait a minute - it’s not even released yet, and there isn’t an official release date anywhere… Right, that’s true. But since the new, highly anticipated version of this popular Vue framework (as repeatedly announced) won’t be a major breaking change, it’s fair to say it’s almost here - and we can start introducing it. Even using it.
However, to be completely honest, this article will focus primarily on the first steps of Nuxt 3, along with some of the additional capabilities you can expect in/from the next version. It’s also worth mentioning that if you already have built application in Nuxt 3 you can easily switch to the new version, couple simple edits would be required tho.
OK, but what are we waiting for? Couple of things actually. First of all there must be a new version of Nitro released. Some of you might ask, what da heck is Nitro?
⚠️ Disclaimer
I think it’s really important to understand how the technology works - not just its APIs, primitives1, and abstractions2, but also what’s under the hood. This makes it easier to see how certain things work and how to approach them if we ever need to dig a bit deeper. Or if AI will stuck somewhere… So, from time to time, I’ll try to do that: dive deeper to show you how everything fits together. I hope this will be helpful.
Nitro... Nitro is a server-dedicated toolchain/framework built for H3. 😜 Dude, c’mon, what’s H3 now?! Stick with me here - so if you know Express.js, you'll see that H3 is essentially a similar framework for building a web server architectures. The key difference? H3 is a minimal wrapper around the Node and Web APIs, along with dedicated adapters. It offers a simpler, more intuitive interface with dedicated helpers and/or macro functions3 to define instances, events, and routes. Plus, it's built with TypeScript, so you get that type safety and an awesome development experience. Although, as mentioned before H3 is a really small framework focused only on essentials. Now, Nitro provides additional abstraction to build these web servers with ease. It comes with predefined configurations, dedicated directory structure, planty of utilities and integrations.
And for those working with Nuxt? Nitro's here as well. It means that when you’re creating your server APIs within the Nuxt’s application structure you’re doing it using Nitro (with H3) as a backbone. OK, but this is just a context, to realize the current state better. And to align the position in which Nuxt currently is it’s really important to mention this PR that we’re waiting for. Accordingly, some (not much) but important things left to be delivered. And as Nitro’s an integral piece of the Nuxt’s architecture it must be well finished and released just before. The great message here is that it’s not stopping us, we can still play with upcoming Nuxt 4 APIs while still using some old internals. Finally, migrating to the newest version should be (as authors claimed) should be easy and straightforward.
While you're reading this, the code and product are free and open-source. The authors are working pro bono for the community, so if you’d like to speed things up and join the movement, you can always contribute and help close issues faster. Go!
Hope to write a quick update soon. ☺️
Installation
Here you will find the installation guide for the current Nuxt (3) version along with the instruction on how to enable the new one (4). It’s a matter of simple configuration, so let’s dive into it.
In your terminal use this command.
npx nuxi@latest init [project-name] To not copy this just like that, soulless, we could check what’s going on here - I believe for some of you it might be quite informative. Quick reminder here: I’ll be approaching stuff that way, helping you to understand more, as mentioned above.
OK, let’s back to the code. What we have here is a command to call npx - the Node Package Execute (runner). It’s included with npm that you’re using to manage and install packages within your Node applications. npx is able to execute packages without even having them installed before. So using it makes the flow much seamless, both for user to get, and for the packages authors to deliver them to end user. Yarn and PNPM will use dlx tool to do the same thing.
Now, npx is calling nuxi, the official Nuxt’s CLI4 tool able to setup, upgrade, extend or even clean your Nuxt project. Here, we’re (init)ializing a new one, inside a new folder that the name we will provide for it - replace [project-name] with your project name. You can also initialize the new project inside existing directory, to do so you need to use this command.
npx nuxi@latest initJust after nuxi will ask you if it should overwrite the existing folder contents or maybe create a new one. Then you will be able to select what kind of package manager you’ll be using, accordingly to our code guidelines we’ll stick to the pnpm. However, you can always run it with your desired package manager.
💡 Interesting Fact
I'm always amazed by how vast the Nuxt ecosystem is. Take nuxi, for example - it's built on top of citty, an unjs CLI builder (unjs being a collection of Nuxt community-driven projects that provide agnostic libraries for building high-performance JavaScript applications).
This is just one of many examples of how interconnected and well-structured the Nuxt ecosystem is. Throughout this series, I'll systematically unpack these tools, showing you how various internal components come together to complement the entire Nuxt ecosystem and its extended family.
At the end CLI will ask you if you want to establish a new git project, you can decide on that and let the process to finish by installing all of the dependencies.
What you’ll get will be this structure.

Alright. If you've worked with Nuxt 2 before, you'll notice that the structure in Nuxt 3 is quite different—more minimalistic. Gone are the numerous folders with README files explaining what each one does.
The “new” (well, not so new anymore) Nuxt approach is all about progressive enhancement - your app grows organically as your development process unfolds. And that’s exactly how we’ll approach it here. This way, you won’t be overwhelmed by a complex, pre-defined structure or find yourself stuck wondering what to do next. Instead, you’ll build up your app step by step, naturally understanding how everything fits together.
Two things here. The rest I’ll describe in a minute.
.nuxt/folder - auto-generated folder that has all of the Nuxt internals. Don’t remove this one, it’s important for your application to work properly.app.vuecomponent - your application entry point, the place where your code “begins”. Inside you’ll find some of the Nuxt Welcome Page “native", pre-added components.
OK, now is the perfect moment when we can make these significant few steps entering into the Nuxt 4 world.
In your
nuxt.config.tsfile addfuture.compatibilityVersionproperty and set it to4(number).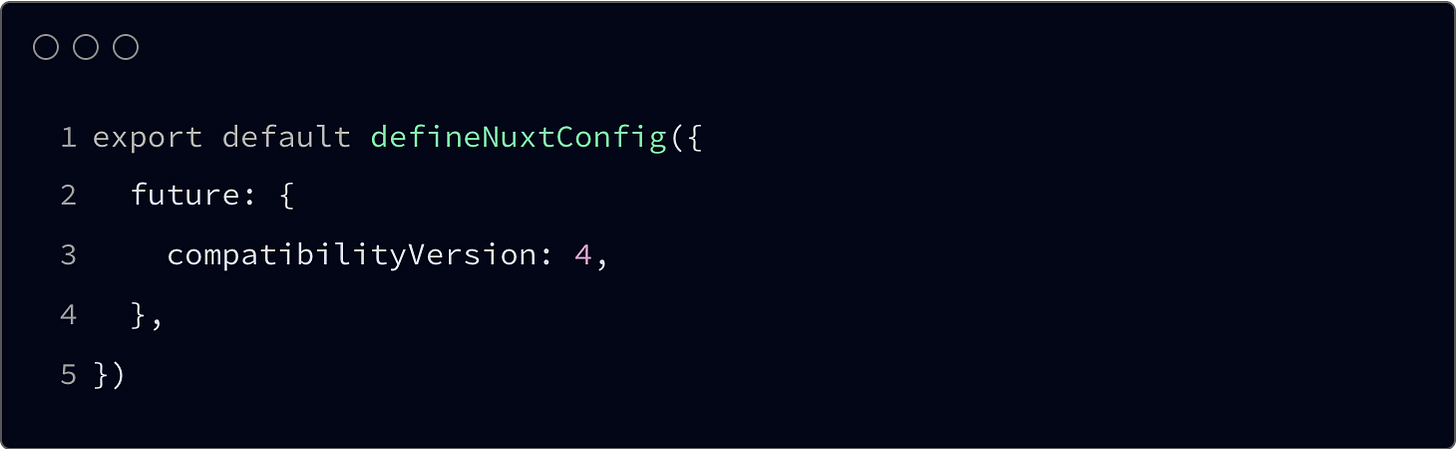
nuxt.config.ts | Enabling Nuxt 4 Compatibility Thanks to this “flag” your application will be able to use all the new features and opted-in enhancements coming straight from the Nuxt 4 version. The
futureobject is meant to be a container for futures that become a default ones. There is one more similar object calledexperimentalwith which you can enable these new and potential features, it’s not set in stone tho that they will finally land within the stable major/minor release.Introduce a new directory structure - a simple rotation. However, if the structure of your application’s more mature than this simple initial one you don’t need to make these changes at any cost. Nuxt will detect the old arrangement and will adopt to it, still delivering new features.

Nuxt 4 Directory Structure OK, let me unpack this:
There is a new
appdirectory, it’s now a new source one (srcDir), this means that everything outside of this folder is a part of the root (rootDir).Folders like (if you have them)
layers,modulesorpublicwill be now relatively resolved to therootDirpath.Historically, Nuxt wasn’t designed for building full-fledged client/backend applications with APIs. The
server/folder was gradually introduced as the framework evolved to accommodate growing backend needs. However, as internal backend applications expanded, developers faced challenges managing the distinct client and server contexts. Now, with Nuxt 3, this new folder structure contributes to a more seamless and powerful development flow. And what’s exciting is that we’ll be diving into this as well - going far beyond traditional SPA development and exploring how Nuxt can be used to build full-stack applications.server/(backend API) folder has now fully autonomous context along with dedicated TS configuration that you can manage from its dedicatedtsconfig.jsonfile.


Now, the important note: Since we're starting a brand-new application, further changes may be introduced as we progress through development. However, if you're migrating from an older version (3) with an advanced and extensive project structure, I highly recommend following the official migration guide provided by the Nuxt team. There are some significant changes you’ll need to address to ensure your application runs smoothly and fully benefits from the new Nuxt 4 features.
Some of them, which worth put attention to:
sharing prerendered data - this one is powerful new feature, very anticipated, introduced recently as an experimental feature, in nutshell it allows to use prefetched data across the different pages, one important thing here might be to use dedicated to data keys while retrieving it from the store (will introduce it later).
That’s it. The rest have (or should have) minimal impact on your codebase, should be as well resolved automatically along with the Nuxt’s internal logic.
Further Steps
Time to move on and start building some sexy stuff. 😜 Let’s dive into the next steps, which are crucial from an overall application development perspective. Some of these decisions might have a big impact down the line, so let's make them wisely!
Hey, but first fire your app dude! Run this command.
pnpm run devYou should see something like this.

As you can see your app will be running as a Nuxt 3 one, however all the compatible features with version 4 will be enabled. That’s what we exactly want for the moment.
Web App Configuration
Now that we have a slightly different directory structure and our web app is separated from the server, we might need some dedicated configuration for the client side. Fortunately, Nuxt already provides this feature through the app.config.ts file. It’s important to understand that app.config.ts is not an extension or replacement for nuxt.config.ts. Instead, it is meant to be used at build time and should only contain public data - it does not have access to environment variables and should never store sensitive information. For managing environment-specific configurations securely, we use runtimeConfig inside nuxt.config.ts, which allows access to values that need to remain private or change at runtime.
OK, let’s add this file, although let’s leave it empty for now.

Two additional things - to keep in mind but don’t overthink them just yet. First, you can add types for both the input and output of the configuration by extending the AppConfigInput interface inside the index.d.ts file. Second, the app.config.ts file can be merged with other app.config.ts files within Nuxt layers - if you define them and use a special merging function. As we progress with development, we’ll explore these features in practice, extending and using them as needed.
Finally, If you want to reach data from that app config you can use built-in composable called useAppConfig(). It will provide you an reactive object with predefined configuration. Call it whenever (any component) you need to get access to app configuration. Important addition may be that it’s available both for server, and client side.
const appConfig = useAppConfig()Pages
Nuxt automatically generates routes based on the pages/ folder structure. While it still uses vue-router under the hood, Nuxt simplifies the process by eliminating the need to manually define route objects or extensive router configurations. However, if you want more control, you can define routes manually. To do this, create a router.options.ts file inside your app/ directory. Within this file, you can set custom rules for your routes, something like this.

It's also important to note that if you don’t provide a pages/ folder, Nuxt will not include vue-router by default. In this case, your application will rely on a single entry point: the app.vue component inside the app/ directory.
However, let’s assume you choose the default approach and create a pages/ folder. This way, Nuxt will automatically generate your routes, making navigation effortless while keeping your project structured and scalable. From that state you have two path that you can go with.
Leaving the
app.vuecomponent as an application entry point. With that you’ll need to use<NuxtPage/>component as an page content container. This way content of any new page will be located within this exact destination. Around this you can create your own dedicated layout, or build external dedicated one - about layouts I’ll write within the next posts.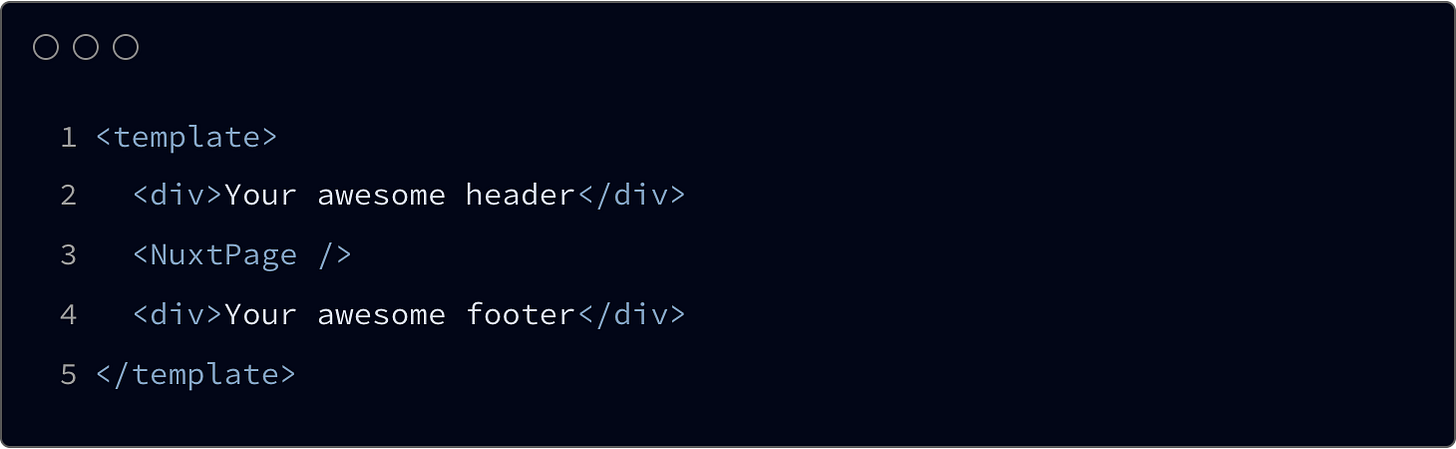
app/app.vue Back in the day, the
app.vuecomponent was the true entry point for a Nuxt/Vue application. It was where you initialized the app and had the option to extend it with external tools. Now, things work a bit differently - you can handle all of this through Nuxt configuration files instead. If you're using thepages/directory for default, automatic routing, it makes sense not to rely onapp.vueas your entry point. That said, if you're building a single-page app, a simple landing page, or a lightweight single-page setup, sticking withapp.vuecan still be a practical choice. If not go with option 2.Removing
app.vue andcreating/using only theindex.vuefile inside your /pagesdirectory. This way you’ll not need the<NuxtPage/>component anymore, and everything what you’ll put inside thepages/index.vuecomponent will became your app entry point instead. Original contents fromapp.vuefile move toindex.vueone.
Default layout will be applied automatically… bit more about this within the next posts. So if you don’t want to miss any of the upcoming materials please subscribe.

Linter & Prettier
Nuxt has its own, dedicated module for ESLint5 integration. To not mess and overcomplicate things at the very beginning let’s use it. Further, we will be able to extend or change this setup. Although, handling it as a “native” solution might be beneficial for now.
Run with this command.
npx nuxi module add eslintNuxi will install all the ESLint internals for you. Packages @nuxt/eslint and eslint will be added. ESLint will be installed in new 9.x version ecquiped with the “new” flat configuration. Now, when you run your application again the eslint.config.mjs file should be created inside your root folder. If not (some issues may occur) you can still install it manually. Use this command.
pnpm add -D @nuxt/eslint eslint typescriptThen, add '@nuxt/eslint' to your modules array in nuxt.config.ts file. No matter if you’ll use the module or manual way you should install typescript package additionally - ESLint will need it anyway. At the end please add the eslint.config.mjs file to the root of your project. Like this.

Time for Prettier6. You can install it with this command.
pnpm add -D prettier eslint-config-prettierAdditionally, we will add a set of rules to complement ESLint. Prettier, along with the eslint-config-prettier package, will handle formatting and also cover all Vue-specific rules, so there’s no need to add anything extra. To see which rules are defined and how they work, you can check the source of the package.
Alright, now let’s create a configuration file for Prettier: prettier.config.mjs (let’s stay consistent with naming and formats). You’ll need something like this.

Most of Prettier’s defaults will be fine for most codebases, one thing that I would suggest is to extend your workspace line with from 90 to 120 characters, and to use single quotes along with any data structures. That’s it.
Let’s include prettier ESLint rules within its configuration. In the eslint.config.mjs file add this enhancement.

Finally, let’s add linting script to our package.json file. Like that.

By adding --fix you’re asking ESLint to fix all of your code bugs; if it’s possible of course. In most cases these will be a small corrects within your code syntax and style.
You can test it now. Run this command.
pnpm run lintIf everything’s as should be, you will get this error message.

Good! This means that the rules provided by eslint-config-prettier working as expected. However, from version 3.2 of Vue we don’t need to have a parent/root Node anymore, so this rule is not necessary here. To disable this warning you can add the vue/no-multiple-template-root rule to your eslint.config.mjs file. Like you can see it below, just after you can run lint command again.

Now, linter should not report any issues and problems with your code. Let’s go!
Husky
As a final step, to get things even more legit and more sexy we can add Husky. Husky is a git hook handler that is able to initialize certain process while running selected git actions. For instance, to parse our files with Linter and Prettier when we’ll be creating a new commit. With Husky we will also add lint-staged (repository) package thanks to which only staged files will be checked. Now, in your root run this command.
pnpm add -D husky lint-stagedYou should be using Husky in version 9, as this configuration refers to it.
Just after inside your package.json file add this script.

Let’s run it to initialize Huksy’s internals.
pnpm run huskyHusky will create a dedicated .husky folder where all the necessary hooks will be added (as files). All of these files will be empty and ready to be filled-in with our desired commands. You can leave them along, or remove (except husky.sh), leaving just pre-commit one (this one will be in use) - up to you.
One additional note here: we defined husky script, not prepare one (as it’s common to do) because when pnpm will run the installation script it will always run the prepare script as well, so to avoid creating Husky files all over (overwriting edits) we’re using a different definition for the Husky init script.
Next, provide lint-staged proper configuration. Inside package.json file please add this notation.

As you can see this is the exact command as we have already defined for our lint script. So now we need to swap them, like that.

Great, now you can run lint-staged command.
pnpm run lintYou should see something like this.

Awesome, Lint Staged works as expected. Finally (I promise), we need to add the same command to our pre-commit git hook file. In the .husky folder, inside the pre-commit file provide this content.

You may want to comment the . "$(dirname "$0")/h" line as it may wrongly read your internal paths and exit the script without running the hooks. Please check the internals as it can be polyfied with your setup.
Now you can add file to git and commit them to the repository. Voilà!
Understand The Most Important Internals
To properly close this first chapter, and wrap version 4 first steps guide I’ll spin around some of the built-in Nuxt features to emphasize how they can help you with further development.
But first, if you’re not subscribed yet go and HIT that button!
Auto Imports 🪝
Nuxt has this amazing feature of auto-imports that will help you write less code by automatically making certain composables, components, and utilities available without needing to import them manually - everything what you’ll put inside the components/, composables/ and utils/ folders. This keeps your code clean and reduces boilerplate.
So instead of:
import { useRoute } from 'vue-router';

const route = useRoute();
You just write:
const route = useRoute();Managing Assets 🖼️
In Nuxt, the assets/ directory is used for static resources like styles, images, fonts, and other files that should be processed by Webpack or Vite. Unlike the public/ folder, files in assets/ are not directly accessible via a URL - they need to be referenced inside your Vue components or stylesheets. Nuxt also automatically processes styles placed inside assets/.
✅ Use assets/ for SCSS, images, and fonts that need processing.
✅ Use public/ for static files that should remain unchanged.
✅ Reference assets with @/assets/ or ~/assets/ in Vue and SCSS.
✅ Define global styles in assets/styles/ and load them via nuxt.config.ts.
State Management 🧵
In Nuxt, state management helps you store, update, and share data across components efficiently. While you can use Vuex (in Nuxt 2) or Pinia, Nuxt 3 (and now with Nuxt 4) introduces a simpler and built-in state management solution using useState().
Layers 🧱
Nuxt Layers are a powerful way to extend, reuse, and modularize Nuxt applications. They let you build applications with multiple codebases, making it easier to share configurations, UI components, and logic across different projects. Think of layers as Nuxt-powered micro-frameworks that can be stacked together like building blocks.
What’s next? Check out how to suit your newly created Nuxt 4 project within the monorepo. Turborepo to be more precise. Your app will be grateful, promise!

OK guys. That’s it for now. Please subscribe to this publication, this way you’ll not miss any further updates, and I’m planning to write a lot, very extensively. Thanks in advance for your trust and support, Lukas.
Please let me know how you find this article. What I can improve?
When I talk about a framework’s primitives, I’m referring to its most fundamental building blocks - the low-level constructs or mechanisms on top of which everything else is built. While each JavaScript framework might label or structure these differently, there are common themes you’ll see repeated: reactivity, rendering, components, and lifecycle hooks.
In frontend programming, abstraction refers to creating simpler, more convenient layers or interfaces on top of complex underlying functionality. This practice allows developers to work with more human-friendly constructs rather than constantly dealing with low-level details. The best example of abstraction, that all of you probably will recognize can be jQuery, abstraction over the browser’s native DOM and event APIs.
Macro functions are essentially a helpers that transforms or generates code before - or at build time - so you don’t have to write repetitive boilerplate by hand. Instead of executing every time the app runs (like a normal function), a macro function is “expanded” during the build or compile process into more detailed code that does what you need.
CLI stands for Command-Line Interface. It's a way to interact with a computer program using text commands in a terminal or command prompt, rather than through a graphical user interface (GUI). In most cases CLI is built from a set of bash scripts that are able to execute some sequence of processes in order to manage application code.
Linter is a tool that helps you catch mistakes and enforce coding standards in your code. Think of it like spell check for programming - it scans your code and warns you about potential issues before they become real problems.
Prettier is an automatic code formatter that ensures your code looks clean and consistent. Unlike a linter (which finds mistakes and enforces rules), Prettier rewrites your code to follow a consistent style - so you don’t have to worry about spaces, colons, indentation, or line breaks.